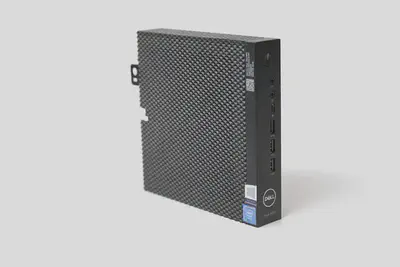
Dell Wyse 5070 Thin Client: RAM and SSD upgrade, BIOS update and BIOS settings for a home server
Please feel free to raise any comments or issues on the website’s Github repository.
Pull requests are very much appreciated.
Table of Contents
Overview
A Dell Wyse 5070 Thin Client. Image credit: -stk, CC BY-SA 4.0, via Wikimedia Commons
My Dell Wyse 5070 Thin Client is my home server.
Before installing anything on it, I upgrade the RAM and the SSD, flash the latest BIOS and go through the BIOS settings once from top to bottom.
This guide covers exactly these three steps:
Dell Wyse 5070 Thin Client with an Intel Celeron J4105 (4 cores) and no Wi-Fi card.
Corsair Vengeance SODIMM 32 GB (2x16 GB) DDR4 2400 MHz CL16 as the new RAM.
Verbatim Vi560 S3 2 TB SSD, SATA III, M.2 2280, as the new system disk.
A USB flash drive for the BIOS update; a small one is enough.
A monitor and a keyboard for the BIOS setup.
1 Upgrade RAM and SSD
I replace the RAM with the two 16 GB Corsair modules, one per SODIMM slot, and put the 2 TB Verbatim SSD into the M.2 slot for SATA SSDs; NVMe SSDs don’t work in it.
The built-in 32 GB eMMC stays where it is; I won’t need it.
Be patient after the RAM upgrade.
The Wyse sometimes takes a while to restart.
Just be patient for a couple of minutes.
2 Flash the latest BIOS
Download the latest Dell Wyse 5070 Thin Client System BIOS from Dell’s support page for the Wyse 5070.
For me, it is currently version 1.40.0 from 10 Dec 2025.
Format a USB flash drive with FAT32.
Copy the downloaded EXE file onto the USB flash drive.
Connect the USB flash drive to the Wyse and switch it on.
Keep hitting F12 to enter the One-Time Boot Menu and select BIOS Flash Update.
Select the BIOS update file on the USB flash drive and click Begin Flash Update.
The Wyse flashes the new BIOS and restarts; don’t cut the power while it is flashing.
Formatting the USB flash drive on a Mac.
In Disk Utility, choose View → Show All Devices, select the USB flash drive itself and erase it with the format MS-DOS (FAT) and the scheme Master Boot Record.
Or in the terminal:
# Find the USB flash drive, e.g. /dev/disk4, and double-check its size and namediskutil list external
# Erase it with FAT32 and an MBR partition table (replace disk4 with your disk)diskutil eraseDisk FAT32 WYSEBIOS MBRFormat /dev/disk4
eraseDiskerases the whole disk you name, so check the identifier twice.
3 Go through the BIOS settings
Restart the Wyse and keep hitting F2 to enter the BIOS setup.
The subsections below follow the menu groups on the left, from top to bottom.
I leave everything not mentioned as it is.
On a used Wyse, the settings may be locked: click Unlock and enter the admin password, which is Fireport by default on Dell Wyse thin clients; section 3.4 replaces it with your own.
When you are done, click Apply to save the settings and Exit to restart.
I do a fresh install, and the Ubuntu installer adds its own boot option later
UEFI Boot Path Security
Always, Except Internal HDD
With the admin password from section 3.4, the Wyse asks for that password before it boots anything but the internal SSD from the F12 menu, e.g. an installer USB stick
3.2 System Configuration
Page
Setting
Note
UEFI Network Stack and UEFI HTTP Boot
Deactivate Enable UEFI Network Stack and UEFI HTTP Boot
I don’t boot over the network
Integrated NIC and 2nd NIC (RJ-45/SFP)
Enabled
Plain Ethernet, without network boot
Serial Port
Disabled
Not needed
SATA Operation
AHCI
Drives
Enable SATA-0
Check its Type (2048 GB) and Device ID (Verbatim Vi560)
SMART Reporting
Activate Enable SMART Reporting
The BIOS reports SMART errors of the SSD at startup
USB Configuration
Activate Enable USB Boot Support, Enable Front USB Ports and Enable Rear USB Ports
USB boot is needed for the installer USB stick
Front USB Configuration and Rear USB Configuration
Enable all ports
The backup HDDs and the installer USB stick use them
USB PowerShare
Deactivate Enable USB PowerShare
I don’t need to charge devices while the Wyse is powered off
Audio
Disable the Audio controller, the Microphone and the Internal Speaker
A server needs no sound
3.3 Video
Page
Setting
Note
Primary Display
Auto
3.4 Security
Page
Setting
Note
Admin Password
Set a new password
Protects the BIOS settings; store it in your password manager
System Password
Not Set
No password at power-on, so that the Wyse boots on its own, e.g. after a power outage
Ubuntu boots with Secure Boot, through its signed shim, GRUB and kernel
Secure Boot Mode
Deployed Mode
Enforces the signature checks; Audit Mode would only check them without blocking anything
Expert Key Management
PK selected, Enable Custom Mode stays off
The factory keys (PK, KEK, db and dbx) stay in place
3.6 Intel Software Guard Extensions
Page
Setting
Note
Intel SGX Enable
Enabled
Enclave Memory Size
128 MB
3.7 Performance
Page
Setting
Note
Multi Core Support
All
All four cores
Intel SpeedStep
Activate Enable Intel SpeedStep
Lower clock speed when idle
C-States Control
Activate C states
Deeper sleep states of the idle CPU
Intel TurboBoost
Activate Enable Intel TurboBoost
Higher clock speed under load
3.8 Power Management
Page
Setting
Note
AC Recovery
Power On
The Wyse starts again after a power outage; with my encrypted SSD, it then waits for the SSH unlock
Auto On Time
Every Day at 1 AM
Switches the Wyse on if it was powered off
Deep Sleep Control
Disabled
Wake on LAN does not work from deep sleep
Fan Control Override
Deactivate Fan Control Override
USB Wake Support
Activate Enable USB Wake Support
A USB keyboard can wake the Wyse from standby
Wake on LAN
LAN Only
Wake on 2nd NIC
Disabled
Block Sleep
Deactivate Block Sleep
3.9 POST Behavior
Page
Setting
Note
Adapter Warnings
Deactivate Enable Adapter Warnings
Numlock LED
Deactivate Enable Numlock LED
Keyboard Errors
Activate Enable Keyboard Error Detection
Fastboot
Thorough
Complete hardware and configuration initialization at every boot
Extend BIOS POST Time
0 seconds
Full Screen Logo
Deactivate Enable Full Screen Logo
3.10 Virtualization Support
Page
Setting
Note
Virtualization
Activate Enable Intel Virtualization Technology
VT for Direct I/O
Activate Enable VT for Direct I/O
3.11 Wireless
Page
Setting
Note
Wireless Device Enable
Deactivate WLAN/BT
My Wyse has no Wi-Fi card
3.12 Maintenance
No changes required: SERR Messages, BIOS Downgrade and BIOS Recovery from Hard Drive are enabled.
4 Next steps
The Wyse is now ready for a fresh installation; mine continues with section 2 of my Nextcloud guide, which boots the Ubuntu Server installer from a USB stick with F12.
Because of UEFI Boot Path Security, the Wyse asks for the admin password from section 3.4 before it boots the USB stick.